Clean Up your template before Sysprep and Capture a reference image in MDT

When you create a reference Image it will in most cases it will be updated with patches. That will make the image bigger and bigger and there fore the deployment of that image will take longer and consume more network resources & unneeded disk space. That can be corrected by getting rid of superseded patches, junk, temp files and much more.

The Solution

Since MDT is the preferred method to create reference images you can download the script, import it as an application and then run the application just before the Sysprep and Capture step. The Script works for the following versions of Windows:

  • Windows 7 SP1
  • Windows 8
  • Windows 8.1 Update
  • Windows Server 2008 2 SP1
  • Windows Server 2012
  • Windows Server 2012 R2

To make this work in Windows 7 and Windows Server 2008 R2 you need to add a hotfix to Packages in MDT. http://support.microsoft.com/kb/2852386

Download the script

Download the script from here: Mirror Mirror 2

Action-CleanupBeforeSysprep Applicationimage

Task Sequenceimage

Created a Group Clean.
Add install a application –> Action-CleanUpBeforeSysprep
Restart Computer (Very Important) without it will not work

image

Source

Deploy Windows 10 and Windows Server vNext Technical Preview Using MDT 2013

1. Mount boot.wim file
Dism /Mount-Image /ImageFile:”D:\DeploymentShare\Operating Systems\Windows Server Technical Preview\sources\boot.wim” /index:1 /MountDir:D:\offline

2. Copy the dism.exe and DISM folder from the Windows 10 Technical Preview boot.wim file to your deployment share, in my case D:\DeploymentShare\Tools\x64.

The dism.exe file and DISM folder are found in the X:\Windows\System32 on your boot image (once booted), or D:\Offline\Windows\System32 if you just mounted the boot.wim.

3. Unmount the image|
Dism /Unmount-Image /MountDir:”D:\Offline” /Discard

4. Edit the Task Sequence
image image 

After copying the files, add two run command line actions to your Windows 10 Technical Preview and Server vNext Preview task sequence after Preinstall – Enable Bitlocker (Offline)

Copy WTP dism.exe
cmd /c copy %deployroot%\tools\%architecture%\dism.exe x:\windows\system32\ /y

Copy WTP DISM subsystem
cmd /c copy %deployroot%\tools\%architecture%\dism\*  x:\windows\system32\dism /y

5. Deploy Machines

image

image

Microsoft Virtual Machine Converter 3.0 Released

New Features in Microsoft Virtual Machine Converter 3.0
The 3.0 release of MVMC adds the ability to convert a physical computer running Windows Server 2008 or above server operating systems or Windows Vista or above client operating systems to a virtual machine running on Hyper-V host.

Standard stuff is:

  • Converts virtual disks that are attached to a VMware virtual machine to virtual hard disks (VHDs) that can be uploaded to Microsoft Azure.
  • Provides native Windows PowerShell capability that enables scripting and integration into IT automation workflows.
    Note The command-line interface (CLI) in MVMC 1.0 has been replaced by Windows PowerShell in MVMC 2.0.
  • Supports conversion and provisioning of Linux-based guest operating systems from VMware hosts to Hyper-V hosts.
  • Supports conversion of offline virtual machines.
  • Supports the new virtual hard disk format (VHDX) when converting and provisioning in Hyper-V in Windows Server® 2012 R2 and Windows Server 2012.
  • Supports conversion of virtual machines from VMware vSphere 5.5, VMware vSphere 5.1, and VMware vSphere 4.1 hosts Hyper-V virtual machines.
  • Supports Windows Server® 2012 R2, Windows Server® 2012, and Windows® 8 as guest operating systems that you can select for conversion.
  • Converts and deploys virtual machines from VMware hosts to Hyper-V hosts on any of the following operating systems:
  • Windows Server® 2012 R2
  • Windows Server® 2012
  • Windows Server 2008 R2 SP1
  • Converts VMware virtual machines, virtual disks, and configurations for memory, virtual processor, and other virtual computing resources from the source to Hyper-V.
  • Adds virtual network interface cards (NICs) to the converted virtual machine on Hyper-V.
  • Supports conversion of virtual machines from VMware vSphere 5.5, VMware vSphere 5.0, and VMware vSphere 4.1 hosts to Hyper-V.
  • Has a wizard-driven GUI, which simplifies performing virtual machine conversions.
  • Uninstalls VMware Tools before online conversion (online only) to provide a clean way to migrate VMware-based virtual machines to Hyper-V.
    Important MVMC takes a snapshot of the virtual machine that you are converting before you uninstall VMware Tools, and then shuts down the source machine to preserve state during conversion. The virtual machine is restored to its previous state after the source disks that are attached to the virtual machine are successfully copied to the machine where the conversion process is run. At that point, the source machine in VMware can be turned on, if required.
    Important MVMC does not uninstall VMware Tools in an offline conversion. Instead, it disables VMware services, drivers, and programs only for Windows Server guest operating systems. For file conversions with Linux guest operating systems, VMware Tools are not disabled or uninstalled. We highly recommend that you manually uninstall VMware Tools when you convert an offline virtual machine.
  • Supports Windows Server and Linux guest operating system conversion. For more details, see the section “Supported Configurations for Virtual Machine Conversion” in this guide.
  • Includes Windows PowerShell capability for offline conversions of VMware-based virtual hard disks (VMDK) to a Hyper-V–based virtual hard disk file format (.vhd file).
    Note The offline disk conversion does not include driver fixes.

Download

Source

MDT 2013 Displaying the task sequence name

On september 2012 i wrote a article about mdt displaying the task sequence name.

I MDT 2012 Update 1 you had to change LiteTouch.wsf to fix this.

In MDT 2013 this much easier to do:

Edit customsettings.ini
Add _SMSTSPackageName=%TaskSequenceName%

Thats it!!

Fixed a Bug in MDT 2013 automatically move computers to the right OU.

On December 2010 i wrote an article: automatically move computers to the right OU.
In MDT 2012 update 1 this was an issue: MDT 2012 settings per task sequence 

In MDT 2013 this is still a issue:

How to fix:

I changed DeployWiz_SelectTS.vbs file and it work again Glimlach

1. Edit DeployWiz_SelectTS.vbs
2. Add after “Dim sTemplate”
Dim sCmd
Set Oshell = createObject(“Wscript.shell”)
3. Add before “End Function” (bottom of page)
sCmd = “wscript.exe “”” & oUtility.ScriptDir & “\ZTIGather.wsf”””
oItem = oSHell.Run(sCmd, , true)

Download DeployWiz_SelectTS2013.7z

MDT Enable TPM tools from Dell, HP, and Lenovo

If you want to automate enabling the TPM chip as part of the deployment process, you need to download the vendor tools and add them to your task sequences, either directly or in a script wrapper.

Add tools from Dell

The Dell tools are available via the Dell Client Configuration Toolkit (CCTK). The executable file from Dell is named cctk.exe. Here is a sample command to enable TPM and set a BIOS password using the cctk.exe tool:

cctk.exe --tpm=on --valsetuppwd=Password1234

Add tools from HP

The HP tools are part of HP System Software Manager. The executable file from HP is named BiosConfigUtility.exe. This utility uses a configuration file for the BIOS settings. Here is a sample command to enable TPM and set a BIOS password using the BiosConfigUtility.exe tool:

BIOSConfigUtility.EXE /SetConfig:TPMEnable.REPSET /NewAdminPassword:Password1234

And the sample content of the TPMEnable.REPSET file:

English
Activate Embedded Security On Next Boot
*Enable
Embedded Security Activation Policy
*No prompts
F1 to Boot
Allow user to reject
Embedded Security Device Availability
*Available

Add tools from Lenovo

The Lenovo tools are a set of VBScripts available as part of the “Lenovo BIOS Setup using Windows Management Instrumentation Deployment Guide.” Lenovo also provides a separate download of the scripts. Here is a sample command to enable TPM using the Lenovo tools:

cscript.exe SetConfig.vbs SecurityChip Active

Adding GPO Pack support in MDT 2013 for Windows 8.1 & 2012 R2

If you ever tried to use GPO Packs in MDT 2013 or ConfigMgr 012 R2, you quickly find out they will fail for Windows 8.1 or 2012 R2. The reason?  Microsoft forgot to add support for Windows 8.1 in the ZTIApplyGPOPack.wsf script.
Luckily it’s easy to fix, and while you’re at it, why not also add support for Windows Server 2012 R2.

Fix the bug

Find the following section in ZTIApplyGPOPack.wsf (line 86 – 92):

sOSVersion = oEnvironment.Item(“OSCurrentVersion”)
If (Left(sOSVersion,3) = “6.2”) and oEnvironment.Item(“IsServerOS”) then
    sOS = “WS2012RTM”
    oLogging.CreateEntry “Using Default Windows Server 2012 RTM GPO Pack”, LogTypeInfo
ElseIf (Left(sOSVersion,3) = “6.2”) and Not(oEnvironment.Item(“IsServerOS”)) then
    sOS = “Win8RTM”
    oLogging.CreateEntry “Using Default Windows 8 RTM GPO Pack”, LogTypeInfoAnd change to:

If (Left(sOSVersion,3) = “6.3”) and oEnvironment.Item(“IsServerOS”) then
    sOS = “WS2012R2”
    oLogging.CreateEntry “Using Windows Server 2012 SP1 PO Pack”, LogTypeInfo
ElseIf (Left(sOSVersion,3) = “6.3”) and Not(oEnvironment.Item(“IsServerOS”)) then
    sOS = “Win81”
    oLogging.CreateEntry “Using Windows 8.1 GPO Pack”, LogTypeInfo
ElseIf (Left(sOSVersion,3) = “6.2”) and oEnvironment.Item(“IsServerOS”) then
    sOS = “WS2012RTM”
    oLogging.CreateEntry “Using Default Windows Server 2012 RTM GPO Pack”, LogTypeInfo
ElseIf (Left(sOSVersion,3) = “6.2”) and Not(oEnvironment.Item(“IsServerOS”)) then
    sOS = “Win8RTM”
    oLogging.CreateEntry “Using Default Windows 8 RTM GPO Pack”, LogTypeInfo

Or download the file Winking smile

ZTIApplyGPOPack.7z

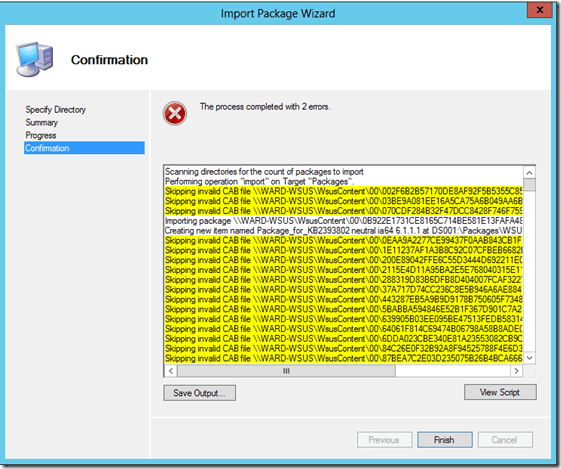
MDT Packages & WSUS a very nice feature.

I long time ago I wrote a acticle mdt-automatisch-updates-via-wsus-laten-installeren-tijdens-het-deployen-van-het-os (Dutch) about using wsus with MDT.

After you deploy a Windows 7 SP1 machine updating takes a lot of time.

You can slipstream windows security updates when you deploy a machine… Windows 7 / Windows 8 / Windows 2008 R2 / Windows 2012.

How you do this: It’s quit simpley. Import de WSUS Content in to Packages.

 1

2

3

4

5

The error is normal because not everything is imported.

Important:

Delete every time you do this. Update & Hotfix packages. If you don’t you will end in a error state when you deploy a machine.

PXE booting fails with "PXE-T04: Access Violation" and "PXE-E36: Error Received from TFTP Server

I had a very strange issue. After updating to MDT 2013 and ADK 8.1 wen a client response getting error PXE-T04: Access Violation” and “PXE-E36: Error Received.

Solution:

Uninstalling WDS role
Reboot
Installing WDS role

Configuring WDS

Add MDT boot Images.

It works again.

WDS was corrupted Great Sad smile

Translate »