OS not starting after removing extra bitlocker boot partition

If you remove the 300mb hidden partition your system does not start anymore.

Solution 1:

Open command prompt
bcdboot c:\windows /s c:
Open diskmgmt.msc & Mark Partion as Active.
Reboot the VM.
Delete the BDEdrive partitie.
Extend the C-Disk with the empty space

Solution 2:

Boot with Windows 7 or WIndows 2008 R2 installation DVD, select repair and open a command prompt.
Type diskpart
Type select disk 0
Type list partition
then note the partition number where you installed windows 7.
Type select partition X (X is the partition number where Windows is installed)
type active
type exit
type bcdboot.exe c:\windows (if C is your windows partition)

Windows Server 8 Beta Active Directory install in Workstation 2012 Tech Preview

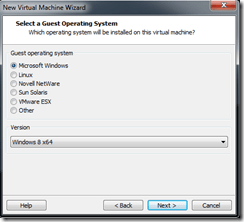
Some days ago I was installing Windows Server 8 aka 2012 in Workstation 2012 Tech Preview. I used the default settings where I choise for Windows 8 x64 as version.
image

I have used these VMs with the VMware Tools from the TechPreview.

As soon as I try to install and configure the Active Director Domain Services, the VM needs to reboot. Once it has rebooted, it goes in a blank screen, and there is nothing I can do. Workstation thinks the VM is running, but there is no response via the GUI in the VM, no response to ping traffic to the VM or RDP.

Solution:
Downgrade from Workstation TP2012 hardware to Workstation 8 hardware and to select Windows 2008 R2 as the guest OS Knipogende emoticon
imageimage

image

Setup KMS Server for Windows Server 2008 R2 or Windows 7

Open the command prompt and run the following command:

cscript c: \ Windows \ System32 \ slmgr.vbs / ipk xxxxx-xxxxx-xxxxx-xxxxx-xxxxx

Enter the product key xxxxx Windows Server 2008 R2. It is also able to activate Windows 7. The following text appears when the command is successful.

Microsoft ® Windows Script Host Version 5.7
Copyright © Microsoft Corporation. All rights reserved.
Installed product key xxxxx-xxxxx-xxxxx-xxxxx-xxxxx successfully.
The installation of the KMS server is complete. The server installs itself on port 1688. This port must be opened to be put in the firewall. To change the port the following command can be used.

Slmgr.vbs / SPRT xxxx
Once the firewall is open and the key is installed, the KMS server service has to be restarted. Do this by using the following command:

slsvc & net stop & net start slsvc

To check whether the data will be registered correctly in the DNS, the following command:

nslookup-type = srv _vlmcs._tcp

Here, the following output should appear:

_vlmcs._tcp.test.local SRV service location:
priority = 0
weight = 0
port = 1688
svr hostname = kms.wardvissers.local
internet address = 192.168.150.7 kms.wardvissers.local

Clients / Servers

The clientele / servers need to connect to the KMS host will automatically find the host by dns. When the client / server using a MAK key is activated. Should this be put back to a KMS client key. These keys are released by Microsoft. When this key is set on the client / server will automatically look for a KMS host. When not present, the client / server activation.

KMS client keys:

Windows 7 Enterprise: 33PXH-7Y6KF-2VJC9-XBBR8-HVTHH
Windows Server 2008 Standard: TM24T-X9RMF-VWXK6-X8JC9-BFGM2
Windows Server 2008 Enterprise: YQGMW-MPWTJ-34KDK-48M3W-X4Q6V
Windows Server 2008 R2 Standard – YC6KT-GKW9T-YTKYR-T4X34-R7VHC
Windows Server 2008 R2 Enterprise – 489J6-VHDMP-X63PK-3K798-CPX3Y

The following commands can the key be changed from MAK to KMS here are the xxxxx is one of the above keys.

slmgr.vbs / ipk xxxxx-xxxxx-xxxxx-xxxxx-xxxxx
Note: To ensure that the client is forced to activate the command to be executed on the client.
slmgr-ato

It can happen that the RMS server returns the following message. This is because the KMS server is just beginning to work with 25 clients and 5 servers.

You can find here the list with error codes & solutions: http://support.microsoft.com/kb/938450

Special thanks to:Harm Hoekstra

Preventing Automatic Service Pack 1 Update to Windows 7 and Windows Server 2008 R2

Microsoft began to distribute Windows 7 and Windows Server 2008 R2 Service Pack 1 (SP1) as a high-priority update through Automatic Updates. However, as with most large corporate environments, IT organizations may want to delay the introduction of a new Service Pack until they have tested compatibility with internal applications and sites.

Microsoft created a tool called “Windows Service Pack Blocker Tool Kit” to stop it from updating your servers and workstations without your permission. Unlike the Blocker Toolkit for IE9, this tool does have an expiration date – the 22nd of February 2012. The tool and can be configured either by running the registry file on the client machines or through Group Policy in domain joined environments.

Download

Download details: www.microsoft.com/downloads/en/details.aspx?FamilyID=D7C9A07A-5267-4BD6-87D0-E2A72099EDB7

The tool can be used with:

  • Windows 7 Service Pack 1
  • Windows Server 2008 R2 Service Pack 1

Toolkit Components

The tool contains three components. All of them function primarily to set or clear a specific registry key that is used to detect and block download of Service Packs from Windows Update. You need to only use one of the components, the one that best serves your organization’s computer management infrastructure.

The components are:

  • A Microsoft-signed executable
  • A script
  • An ADM template

Registry key

The executable creates a registry key on the computer on which it is runs that blocks or unblocks (depending on the command-line option used) the delivery of a Service Pack to that computer through Windows Update. The key used is HKLM\Software\Policies\Microsoft\Windows\WindowsUpdate.

Key value name: DoNotAllowSP

  • When the key value name is not defined, distribution is not blocked.
  • When the key value name is set to 0, distribution is not blocked.
  • When the key value name is set to 1, distribution is blocked.

Blocker Script

The script does the same thing as the executable, but allows you to specify the remote machine name on which to block or unblock delivery of Service Packs.

When the ‘/B’ command line option is used, the key value name ‘DoNotAllowSP‘ is created and its value set to 1. This value blocks delivery of a Service Pack to the computer through Automatic Update or Windows Update.

When the ‘/U’ command line option is used, the previously created registry value that temporarily blocked the delivery of a Service Pack to the computer through Automatic Update or Windows Update is removed. If the value does not exist on the computer on which it is run, no action is taken.

Note: The executable and script have been tested only as a command-line tool and not in conjunction with other systems management tools or remote execution mechanisms.

Group Policy Administrative Template (.ADM file)

The ADM template allows administrators to import group policy settings to block or unblock delivery of Service Packs into their Group Policy environment. Administrators can then use Group Policy to centrally execute the action across systems in their environment.

Add the .ADM file to the Group Policy by going to Computer Configuration > Administrative Templates. Right click and select Add/Remote Templates. Browse to the location of the .ADM file and click Ok.

Windows 7 and Windows Server 2008 R2 SP1 Blocker: Group Policy Settings

Users running Windows 7 and Windows Server 2008 R2 will see the policy setting under Computer Configuration > Administrative Templates > Classic Administrative Templates (ADM) > Windows Components > Windows Update.

Block Windows 7 and Windows Server 2008 R2 SP1 automatic updates

Please note that this toolkit will not prevent the installation of the service pack from CD/DVD, or from the stand-alone download package. This simply prevents Windows 7 and Windows Server 2008 R2 Service Pack 1 (SP1) from being delivered over Windows Update.

How to create a Windows 7 x86 or x64 WMI Filter

I want to deploy some applications to different OS versions. I created some WMI filters. I added the right Group Policy to the right WMI filter.

Target Win 7 32 bit machines:

select * from Win32_OperatingSystem WHERE Version like "6.1%" AND ProductType="1" AND NOT OSArchitecture = "64-bit"

Target Win 7 64Bit machines:

select * from Win32_OperatingSystem WHERE Version like "6.1%" AND ProductType="1" AND OSArchitecture = "64-bit"

Target any 32 bit OS;

SELECT AddressWidth FROM Win32_Processor WHERE AddressWidth =’32’

Target any 64Bit OS:

SELECT AddressWidth FROM Win32_Processor WHERE AddressWidth =’64

Windows Server 2008 R2 Hyper-V SP1 Component Architecture Poster

This poster provides a visual reference for understanding key Hyper-V technologies in Windows Server 2008 R2 Service Pack 1. It focuses on architecture, snapshots, live migration, virtual networking, storage, RemoteFX and Dynamic Memory.

To download the poster click on the picture
image

Group Policy Preferences Data Sources Failed with error 0x80070057

clip_image002
Group Policy Data Sources is voltooid.

Aanvullende gegevens:

Het voorkeursitem computer ‘Nordined’ in het groepsbeleidsobject ‘De naam van de policy {54A928D5-EAA8-421B-9F12-066B350B6671}’ is niet toegepast, omdat het is mislukt met foutcode ‘0x80070057 De parameter is onjuist.’%%100790273

Oplossing:

clip_image004

clip_image006

Edit Datasources.xml
<?xml version="1.0" encoding="utf-8"?>

<DataSources clsid="{380F820F-F21B-41ac-A3CC-24D4F80F067B}"><DataSource clsid="{5C209626-D820-4d69-8D50-1FACD6214488}" name="WARD" image="2" changed="2011-03-02 09:04:35" uid="{2E9E5014-DEA3-4B65-AD9A-B8A6C602E576}" userContext="1" removePolicy="0"><Properties action="U" userDSN="0" dsn="WARD" driver="SQL Server" description="Ward" username="" cpassword=""><Attributes><Attribute name="SERVER" value="SQLSERVERNAME"/><Attribute name="TRUSTED_CONNECTION" value="Yes"/><Attribute name="DATABASE" value="DATABASENAAM"/></Attributes></Properties></DataSource>

</DataSources>

Delete username="" and cpassword=""
<?xml version="1.0" encoding="utf-8"?>

<DataSources clsid="{380F820F-F21B-41ac-A3CC-24D4F80F067B}"><DataSource clsid="{5C209626-D820-4d69-8D50-1FACD6214488}" name="WARD" image="2" changed="2011-03-02 09:04:35" uid="{2E9E5014-DEA3-4B65-AD9A-B8A6C602E576}" userContext="1" removePolicy="0"><Properties action="U" userDSN="0" dsn="WARD" driver="SQL Server" description="Ward" ><Attributes><Attribute name="SERVER" value="SQLSERVERNAME"/><Attribute name="TRUSTED_CONNECTION" value="Yes"/><Attribute name="DATABASE" value="DATABASENAAM"/></Attributes></Properties></DataSource>

Now the policy is deployed succesvol Open-mouthed smile

NTFS Chkdsk Best Practices and Performance

Claus Joergensen, one of the founding fathers of Windows Storage Server, had a great post today about a new white paper, available here, discussing the best practices and guidance for sizing NTFS volumes. The paper also has details on self-healing NTFS and Chkdsk execution times on Windows Server 2008 R2.

When planning Windows file server deployments, we are often asked questions such as “How large can I make my volumes?” or “How long will it take to repair a volume?”. This white paper helps answer these questions.

Table of Contents:

  • Self-Healing and Chkdsk
  • How to run Chkdsk
  • Chkdsk Exit Codes
  • Improving General Availability of the Server
  • Chkdsk performance on Windows Server 2008 R2
  • Block Caching Improvements in Windows Server 2008 R2
  • Effect of Volume Size on execution time of Chkdsk
  • Effect of Number of files and Different OS versions on execution time of Chkdsk
  • Effect of Physical Memory at different Number of files on execution time
  • Effect of short file names on Chkdsk execution time
  • Effect of Enabling/Disabling short file names
  • Conclusion
  • Call to Action
  • Resources   

If you are planning a Windows file server deployment or is looking to upgrade an existing Windows file server deployment to Windows Server 2008 R2, you should consult the white paper. It outlines how with Windows Server 2008 R2, NTFS can scale to easily support 15 TB file systems with 10 million files! Even with hundreds of millions of files the Chkdsk execution times are really fast. My favorite statistic is that a volume with 300 million files is able to Chkdsk in about 6 hours, that is so much faster than the old days.

SOURCE: http://blogs.technet.com/b/storageserver/archive/2011/02/23/guidance-for-sizing-ntfs-volumes.aspx

Translate »