Using Get-vSANClusterHealth for Your Own Custom vSAN Health Reporting

I my made my own vSAN Health report based on Get-vSANinfo

You can find the script on my Github: Link

That script dit not get all info that i wanted. I use is for all my different homelabs.

Funtions: Cluster,Hosts,VMs,vSANVersion,vSanUpgrade,HealthCheckEnabled,TimeOfHclUpdate,StoragePolicy,vSanDiskClaimMode,faultdomaincount,ObjectOutOfcompliance,vSanOverallHealth,vSanOverallHealthDescription,vSanHealthScore,ComponentLimitHealth,OpenIssue,vSanFreeSpaceTB,vSanCapacityTB

Addons:
PerformanceServiceEnabled
PerformanceStatsStoragePolicy
faultdomaincoun
StretchedClusterEnabled
vSanFailureToTolerate (Works only in Second run, Work in Progress)

You schedule the script and send it to your e-mail

VCF MGMT domain

Homelab

Easy Way To Check vCenter Linked Partner Replication Status”

Symptoms

  • You see a error  vCenter Server Replication Status : RED . Replication state is broken for the node: vCenter2.wardvissers.nl
  • You may be missing one or more vCenters from the inventory tree

You can check vCenter Server Management vCenterurl:5480

Possible Causes

  • vCenter services failing
  • Low Disk Space
  • Network/firewall blocking communication
  • vCenter Platform Services Controller misconfiguration: VMware KB 2050273

Let’s Check it

Here are some commands you can run to see what vCenter is doing behind the scenes!

  • /usr/lib/vmware-vmdir/bin/vdcrepadmin -f showpartnerstatus -h localhost -u administrator
  • /usr/lib/vmware-vmdir/bin/vdcadmintool –> option 6
  • Check the logs
  • Check ping/ssh
  • More documentation here: VMware KB 2127057

VCF 5.0 running inside Nested ESXi server with only 64GB Memory

So I interested to trying to deploy latest release of VMware Cloud Foundation (VCF) 5.0 on my Windows 11 Home PC witch have 128GB and 16 core intel cpu.

William Lee wrote a nice artikel about VMware Cloud Foundation 5.0 running on Intel NUC

Disclaimer: This is not officially supported by VMware, please use at your own risk.

Requirements:

  • VMware Cloud Builder 5.0 OVA (Build 21822418)
  • VCF 5.0 Licenses Through VMUG ADVANTAGE
  • Home PC (Not Special Hardware)
    – 128GB Memory
    – Intel 12600 CPU
    – 4TB of NVME Storage
  • Windows 11 with VMware Workstation 17

Setup

Virtual Machines

  • DC02 (Domain Controller, DNS Server) (4GB 2vcpu)
  • VCF-M01-ESX01 (ESXi 8.0 Update 1a) (64GBGB 1x140GB 2x600NVME 2x NIC) (Every Thin Provisiond)
  • VCF-M01-CB01 (4GB and 4CPU) Only needed through First Deploment

Network settings on my PC

  • 1 IP In my home network
  • 172.16.12.1 (To Fool Cloudbuilder)
  • 172.16.13.1 (To Fool Cloudbuilder)

Procedure:

Install en Configure ESXi

Step 1 – Boot up the ESXi installer from de iso mount and then perform a standard ESXi installation.

Step 2 – Once ESXi is up and running, you will need to minimally configure networking along with an FQDN (ensure proper DNS resolution), NTP and specify which SSD should be used for the vSAN capacity drive. You can use the DCUI to setup the initial networking but recommend switching to ESXi Shell afterwards and finish the require preparations steps as demonstrated in the following ESXCLI commands:

esxcli system ntp set -e true -s pool.ntp.org
esxcli system hostname set –fqdn vcf-m01-esx01.wardvissers.nl

Note: Use vdq -q command to query for the available disks for use with vSAN and ensure there are no partitions residing on the 600GB disks.
Don’t change time server pool.ntp.org.

To ensure that the self-signed TLS certificate that ESXi generates matches that of the FQDN that you had configured, we will need to regenerate the certificate and restart hostd for the changes to go into effect by running the following commands within ESXi Shell:

/bin/generate-certificates
/etc/init.d/hostd restart

Cloudbuilder Config

Step 3 – Deploy the VMware Cloud builder in a separate environment and wait for it to be accessible over the browser. Once CB is online, download the setup_vmware_cloud_builder_for_one_node_management_domain.sh setup script and transfer that to the CB system using the admin user account (root is disabled by default).

Step 4 – Switch to the root user and set the script to have the executable permission and run the script as shown below

su –
chmod +x setup_vmware_cloud_builder_for_one_node_management_domain.sh
./setup_vmware_cloud_builder_for_one_node_management_domain.sh

The script will take some time, especially as it converts the NSX OVA->OVF->OVA and if everything was configured successfully, you should see the same output as the screenshot above.

A screenshot of a computer

Description automatically generated

Step 4 – Download the example JSON deployment file vcf50-management-domain-example.json and and adjust the values based on your environment. In addition to changing the hostname/IP Addresses you will also need to replace all the FILL_ME_IN_VCF_*_LICENSE_KEY with valid VCF 5.0 license keys.

Step 5 – The VMnic in the Cloud Builder VM will acked als a 10GB NIC so I started the deployment not through powershell but normal way in Cloud Builder GUI.

Your deployment time will vary based on your physical resources but it should eventually complete with everything show success as shown in the screenshot below. (I have one retry for finish)
A screenshot of a computer

Description automatically generated A screenshot of a cloud support

Description automatically generated
Here are some screenshots VCF 5.0 deployment running on my home PC.

A screenshot of a computer

Description automatically generated

A screenshot of a computer

Description automatically generated

Problems

Check this if you have problems logging in NSX:
https://www.wardvissers.nl/2023/07/26/nsx-endless-spinning-blue-cirle-after-login/

Next Steps.

1. Reploy with use of the Holo-Router https://core.vmware.com/resource/holo-toolkit-20-deploy-router#deploy-holo-router

2. Testing if can deploy Single Host VCF Workload Domain, on same way by following this blog post HERE! 😁
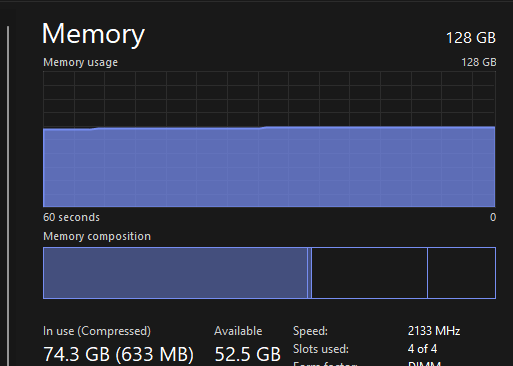
A screenshot of a computer

Description automatically generated

If I can start another 64GB ESXi Server.

Enable Virtualization-based Security on a Virtual Machine on Nested ESXi Server in VMware Workstation

First Step Shutdown ESXi Server enable Encryption
Graphical user interface, application

Description automatically generated

Second Add vTPM

Graphical user interface, application, Word

Description automatically generated

Boot ESXi Server(s)

Configure Key Providers (Add Native Key Provider)

Graphical user interface, text, application, website

Description automatically generated

A screenshot of a computer

Description automatically generated

Now you can add vTPM to you VM
Don’t forget to enable VBS

Graphical user interface, application

Description automatically generated

Create GPO SRV 2022 – Virtualization Based Security and I did Apply only to my Server 2022 Lab Environment
Graphical user interface, application

Description automatically generated

System Information on my Server 2022 Lab Server
A screenshot of a computer

Description automatically generated with medium confidence

Virtual Machine with Windows Server 2022 with KB5022842 (Feb 2023) installed and configured with secure boot will not boot up on vSphere 7 unless updated to 7.0u3k (vSphere 8 not affected)

Virtual Machine with Windows Server 2022 with KB5022842 (Feb 2023) installed en configured with secure boot enabled will not boot up on vSphere 7 unless updated to 7.0u3k (vSphere 8 not affected)

VMware Seciroty Violation message

In VM vmware.log, there is ‘Image DENIED’ info like the below:
2023-02-15T05:34:31.379Z In(05) vcpu-0 – SECUREBOOT: Signature: 0 in db, 0 in dbx, 1 unrecognized, 0 unsupported alg.
2023-02-15T05:34:31.379Z In(05) vcpu-0 – Hash: 0 in db, 0 in dbx.
2023-02-15T05:34:31.379Z In(05) vcpu-0 – SECUREBOOT: Image DENIED.

To identify the location of vmware.log files:

  1. Establish an SSH session to your host. For ESXi hosts
  2. Log in to the ESXi Host CLI using root account.
  3. To list the locations of the configuration files for the virtual machines registered on the host, run the below command:

#vim-cmd vmsvc/getallvms | grep -i “VM_Name

  1. The vmware.log file is located in virtual machine folder along with the vmx file.
  2. Record the location of the .vmx configuration file for the virtual machine you are troubleshooting. For example:

/vmfs/volumes/xxxxxxxx-xxxxxxx-c1d2-111122223333/vm1/vm1.vmx
/vmfs/volumes/xxxxxxxx-xxxxxxx-c1d2-111122223333/vm1/vmware.log

Resolution

This issue is resolved in VMware ESXi 7.0 U3k, released on February 21st 2023. Build 21313628
A screenshot of a computer

Description automatically generated with medium confidence
Notes:

  • Virtual machines running on any version of vSphere ESXi 8.0.x are not impacted by this issue
  • vSphere ESXi 6.7 is End of general Support. For more information, see The End of General Support for vSphere 6.5 and vSphere 6.7 is October 15, 2022.
  • If you already face the issue, after patching the host to ESXi 7.0 Update 3k, just power on the affected Windows Server 2022 VMs. After you patch a host to ESXi 7.0 Update 3k, you can migrate a running Windows Server 2022 VM from a host of version earlier than ESXi 7.0 Update 3k, install KB5022842, and the VM boots properly without any additional steps required.

Translate »