My Favorites Visual Studio Code Plugins

When i begon with scripting using PowerShell ISE for Coding.

PowerShell ISE and Visual Studio Code are free coding tools from Microsoft.

But when Visual Studio Code was released back in 2015 i was switching to that. Powershell ISE i still use on a daily base for some basic tasks.

But with de Extenions list for Visual Studio Code getting better and better scripting is much faster and without errors and easyer to read.

The list with favo extensions is getting bigger en bigger.
Which makes my live a little easyer and helpfull.

So the list of my Favorites:
Prettier – Code Formatter
TODO Highlight
Code Spell Checker
Dutch – Code Spell Checker
Code Snap
Error Lens
Hashicorp HCL
HashiCorp Terraform

Because AI is hot I ám currently testing the following plugins
ChatGPT
GitHub CoPilot
GitHub CoPilot Chat

Using the ChatGPT/CoPilot plugins makes scripting even faster

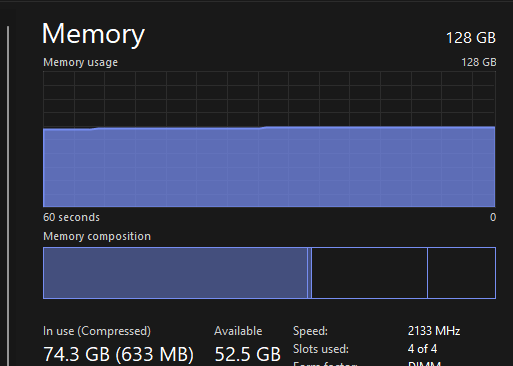
VCF 5.0 running inside Nested ESXi server with only 64GB Memory

So I interested to trying to deploy latest release of VMware Cloud Foundation (VCF) 5.0 on my Windows 11 Home PC witch have 128GB and 16 core intel cpu.

William Lee wrote a nice artikel about VMware Cloud Foundation 5.0 running on Intel NUC

Disclaimer: This is not officially supported by VMware, please use at your own risk.

Requirements:

  • VMware Cloud Builder 5.0 OVA (Build 21822418)
  • VCF 5.0 Licenses Through VMUG ADVANTAGE
  • Home PC (Not Special Hardware)
    – 128GB Memory
    – Intel 12600 CPU
    – 4TB of NVME Storage
  • Windows 11 with VMware Workstation 17

Setup

Virtual Machines

  • DC02 (Domain Controller, DNS Server) (4GB 2vcpu)
  • VCF-M01-ESX01 (ESXi 8.0 Update 1a) (64GBGB 1x140GB 2x600NVME 2x NIC) (Every Thin Provisiond)
  • VCF-M01-CB01 (4GB and 4CPU) Only needed through First Deploment

Network settings on my PC

  • 1 IP In my home network
  • 172.16.12.1 (To Fool Cloudbuilder)
  • 172.16.13.1 (To Fool Cloudbuilder)

Procedure:

Install en Configure ESXi

Step 1 – Boot up the ESXi installer from de iso mount and then perform a standard ESXi installation.

Step 2 – Once ESXi is up and running, you will need to minimally configure networking along with an FQDN (ensure proper DNS resolution), NTP and specify which SSD should be used for the vSAN capacity drive. You can use the DCUI to setup the initial networking but recommend switching to ESXi Shell afterwards and finish the require preparations steps as demonstrated in the following ESXCLI commands:

esxcli system ntp set -e true -s pool.ntp.org
esxcli system hostname set –fqdn vcf-m01-esx01.wardvissers.nl

Note: Use vdq -q command to query for the available disks for use with vSAN and ensure there are no partitions residing on the 600GB disks.
Don’t change time server pool.ntp.org.

To ensure that the self-signed TLS certificate that ESXi generates matches that of the FQDN that you had configured, we will need to regenerate the certificate and restart hostd for the changes to go into effect by running the following commands within ESXi Shell:

/bin/generate-certificates
/etc/init.d/hostd restart

Cloudbuilder Config

Step 3 – Deploy the VMware Cloud builder in a separate environment and wait for it to be accessible over the browser. Once CB is online, download the setup_vmware_cloud_builder_for_one_node_management_domain.sh setup script and transfer that to the CB system using the admin user account (root is disabled by default).

Step 4 – Switch to the root user and set the script to have the executable permission and run the script as shown below

su –
chmod +x setup_vmware_cloud_builder_for_one_node_management_domain.sh
./setup_vmware_cloud_builder_for_one_node_management_domain.sh

The script will take some time, especially as it converts the NSX OVA->OVF->OVA and if everything was configured successfully, you should see the same output as the screenshot above.

A screenshot of a computer

Description automatically generated

Step 4 – Download the example JSON deployment file vcf50-management-domain-example.json and and adjust the values based on your environment. In addition to changing the hostname/IP Addresses you will also need to replace all the FILL_ME_IN_VCF_*_LICENSE_KEY with valid VCF 5.0 license keys.

Step 5 – The VMnic in the Cloud Builder VM will acked als a 10GB NIC so I started the deployment not through powershell but normal way in Cloud Builder GUI.

Your deployment time will vary based on your physical resources but it should eventually complete with everything show success as shown in the screenshot below. (I have one retry for finish)
A screenshot of a computer

Description automatically generated A screenshot of a cloud support

Description automatically generated
Here are some screenshots VCF 5.0 deployment running on my home PC.

A screenshot of a computer

Description automatically generated

A screenshot of a computer

Description automatically generated

Problems

Check this if you have problems logging in NSX:
https://www.wardvissers.nl/2023/07/26/nsx-endless-spinning-blue-cirle-after-login/

Next Steps.

1. Reploy with use of the Holo-Router https://core.vmware.com/resource/holo-toolkit-20-deploy-router#deploy-holo-router

2. Testing if can deploy Single Host VCF Workload Domain, on same way by following this blog post HERE! 😁
A screenshot of a computer

Description automatically generated

If I can start another 64GB ESXi Server.

HPE Oneview Powershell Clear Alerts

You need: https://github.com/HewlettPackard/POSH-HPOneView/wiki

################################################################
#
#Naam:              Oneview Clear Alarms
#Version:           0.1
#Author:            Ward Vissers
################################################################


# Adding PowerCLI core snapin, also check if powerCLI module is alsready added

if (!(get-module -name HPOneView.400 -erroraction silentlycontinue)) {
import-module HPOneView.400 | out-null
}


$oneviewserver = “oneview.wardvissers.nl”
Connect-HPOVMgmt -Hostname $oneviewserver
Get-HPOVAlert | Set-HPOVAlert -Cleared
Get-HPOVAlert -State Active | Set-HPOVAlert -Cleared

Deploy Multi VM’s based on Windows Template

I love powershell. I created a little script to deploy multi VM based on a Windows Template throug CSV file.

It’s create a computer account at the specfified ou. He greates also a Domain Local Group for management. (It used in the customization not specified here)

TempVMlist.csv

server,cpu,memory,DestinationCluster,OSCustomizationSpec,VMtemplate,adgroup

WARDTEST01,2,8,CLUSTER01,W2012R2_Demo,TPL_W2012R2_STD,ServerAdmin

MultiVM.ps1

#Filename: MultiVM.ps1

#Author: W. Vissers

#Source:

#Version: 1.1

#Date: 08-05-2018

#ChangeLog:

# V1.0 – Module Active Directory

#      – Module VMware PowerCli

#      – Active Directory Computer Account, Group

#      – Host Selected from Cluster with Least Memory

#      – Storage selection based on volume with most free space

# V1.1 – Added Harddisk 1&2

#      – Changed porte group other vlan

#

<#

.SYNOPSIS

Script to create a virtual machine from template

.DESCRIPTION

Script to create a virtual machine from template

.EXAMPLE

MultiVM.ps1

#>

################################## INIT #################################################

# LoadModule Active Directory

if (!(Get-Module “activedirectory”)) {Import-module activedirectory}

Else {Write-Host “Module Active Directory is al ready loaded”}

# LoadModule VMware PowerCLI

# if (!(Get-Module “VMware.PowerCLI”)) {

#    Find-Module VMware.PowerCLI

#    Install-Module -Name VMware.PowerCLI -Scope CurrentUser

#}

#Else

# {

# Write-Host “Module PowerCLI is al ready loaded”

# }

#Config

$ouservers=”OU=Servers,DC=wardvissers.nl,DC=nl”

$ougroup=”OU=GroepObjecten,DC=wardvissers,DC=nl”

$folder=”Applicatie Servers”

$DestinationVC =”vcenter01.wardvissers.nl

#Username

if (!$username ) { $username = Read-Host “Give vCenter username ‘wardvissers\admin'”}

#Password

if ( -NOT $Password ) {

$PasswordSec = Read-Host “Give vCenter password” -AsSecureString

$Password = [Runtime.InteropServices.Marshal]::PtrToStringAuto([Runtime.InteropServices.Marshal]::SecureStringToBSTR($PasswordSec))

}

#Connect vCenter

$ConnectVC = Connect-VIServer $DestinationVC -Username $Username -Password $Password -AllLinked

$AllVMs = @()

$AllVMs = Import-Csv “D:\TempVMlist.csv”

foreach ($vm in $AllVMs) {

#Haal De Gegevens op

$server=$($vm.server)

$memory=$($vm.memory)

$cpu=$($vm.cpu)

$DestinationCluster=$($vm.DestinationCluster)

$OSSpec=”$($vm.OSCustomizationSpec)”

$VMtemplate=$($vm.VMtemplate)

$group=$($vm.adgroup)

$harddisk1=$($vm.harddisk1)

$harddisk2=$($vm.harddisk2)

Write-Host “$server heeft $memory GB memory en $cpu cpu(‘s)”

if ($server.length -gt 15) {

Write-Output “Hostname cannot contain more than 15 characters.”

$server = Read-Host “Re-enter hostname for host $server”}

Else

{

Write-Host “Server is umc server”

#Maak AD Groep aan en Computer Account

New-ADComputer -Name $server -Path $ouservers -Enabled $true

New-ADGroup -Name “DLG.$server” -SamAccountName “DLG.$server” -GroupCategory Security -GroupScope DomainLocal -DisplayName “DLG.$server” -Path $ougroup

Add-ADGroupMember -Identity “DLG.$server” -Members $group

}

# Rol server uit van Template

# Select the host with the less used memory

$DestinationHost = Get-Cluster –Name $DestinationCluster –Server $DestinationVC | Get-VMhost -State Connected | Sort-Object -Property MemoryUsageGB | Select-Object -First1

# Select DataStore with the most free space and not in maintance

$destinationDatastore = Get-Cluster $DestinationCluster | Get-Datastore | Where {$_.State -ne “Maintenance”} | Sort-Object -Property FreeSpaceGB -Descending | Select-Object -First 1

# Finally, I deploy my VM with the New-VM cmdlet using my template and OS specs. I place the VM on the ESXi host and store the VM on the datastore.

New-VM -Name $server -Template $VMTemplate -OSCustomizationSpec $OSSpec -VMHost $DestinationHOST -Datastore $DestinationDatastore -Location $folder

Get-VM $server | Set-VM -NumCpu $cpu -MemoryGB $memory -Confirm:$false

if ($harddisk1 -gt 60){Get-HardDisk -vm $server | Where {$_.Name -eq “Hard disk 1”} | Set-HardDisk -CapacityGB $harddisk1 -Confirm:$false}

if ($harddisk2 -gt 20) {Get-HardDisk -vm $server | Where {$_.Name -eq “Hard disk 2”} | Set-HardDisk -CapacityGB $harddisk2 -Confirm:$false}

Get-VM $server | Start-VM -Confirm:$false

Get-VM $Server | Get-NetworkAdapter | Set-NetworkAdapter -Connected $true -Confirm:$false

}

RVtools 3.10 Released

Version 3.10 (February, 2018)
– Upgraded RVTools solution to Visual Studio 2017
– Upgraded RVTools to .Net Framework version 4.6.1
– Upgraded Log4net to version 2.0.8, Waffle.AD to version 1.8.3
and NPOI to version 2.3.0
– Connection error when TLSv1.0 and TLSv1.1 are disabled and only TLSv1.2 is
enabled is solved by using .Net Framework 4.6.1
– vInfo tab page new columns: The latency-sensitivity setting of the virtual
machine, Change Block Tracking (CBT) and disk.EnableUUID values
– vDisk tab page new columns: SCSI label, unit number and sharedBus
– vHost tab page new columns: Assigned License(s), ATS heartbeat, ATS locking
values. 0 = disabled 1 = enabled, Host Power Policy shortname, CPU Power
Management current policy and CPU power hardware support
– When Export to xlsx is executed a metadata worksheet with version number of
RVTools and date time stamp is added to the output xlsx file
– All columns in the RVTools export xlsx file(s) now have a filter
– When export to csv newline characters are replaced by spaces
– When started from cli and login fails an error message and login box was
displayed. Now RVTools will exit with exit code -1, without showing the error
message and login form.
– Added an example PowerShell script with which you can merge RVTools export
xlsx files
– Added a example PowerShell script to start Export all to xlsx for multiple vCenters
– vDatastore tab page: For NFS datastores the address column is now filled with
remote host and path info
– vDatastore tab page new columns: Datastore Cluster Name, Cluster capacity and
Cluster free space
– The upper limit on the Health check for number of VMs on a datastore is now
9999
– vHealth tab page: new column “message type” which can be used as a filter in
Excel
– vHealth tab page: hbrdisk.RDID files are no longer reported as possible zombie
files
– vHealth tab page: low disk space messages no also show the free space in MB.
– All tab pages: Refresh or auto-refresh will respect your sort order
– CLI export2xls parameters changed to export2xlsx (old parameter will still work)
– Bug Fix: invalid “Horizontal Alignment” value in xlsx style sheet.
– Bug Fix: Calculation of total snapshot size was not always correct
– Bug Fix: Child snapshot hierarchy was not always correct
– Default installation directory is changed to C:\Program Files
(x86)\RobWare\RVTools without the version number

Documentation

Download

Install VMware PowerCli

1. Install the Powershell Get Module

Installing items from the Gallery requires the latest version of the PowerShellGet module, which is available in Windows 10, in Windows Management Framework (WMF) 5.0, or in the MSI-based installer (for PowerShell 3 and 4).

With the latest PowerShellGet module, you can:

Supported Operating Systems

The PowerShellGet module requires PowerShell 3.0 or newer.

Therefore, PowerShellGet requires one of the following operating systems:

  • Windows 10
  • Windows 8.1 Pro
  • Windows 8.1 Enterprise
  • Windows 7 SP1
  • Windows Server 2016
  • Windows Server 2012 R2
  • Windows Server 2008 R2 SP1

PowerShellGet also requires .NET Framework 4.5 or above. You can install .NET Framework 4.5 or above from here.

2. Find-Module -Name VMware.PowerCLI

3. Install-Module -Name VMware.PowerCLI -Scope CurrentUser

4. When you start Powershell VMware.Powershell is automatically loaded

VMware Disk to Windows Disk Script

vCenter01

Credentials

ClusterNode

virtuelemachine

DiskInfo

Script: VMwareDisktoWindows.ps1

# VMware to Windows Disk Script                                    
#                                                                                                   
# Author     : Ward Vissers                                                                                
# created on : 08-11-2017                                                                                  
# version    : V1.0                                                                                         
# Source     : http://www.enterprisedaddy.com/2016/07/powercli-match-windows-disk-to-vmware-harddisk/  
#
# V0.1 Testing
# V0.2 Line 33 $vm to $vm.name(Bug Found)
# V0.3 Graphical Version Select VM
# V0.4 Add Select VM from Cluster
# V1.0 Add Selection of multiple vCenter                                                                                                      
#
# $VCServerList is a comma-separated list of vCenter servers
$VCServerList = “vCenter01.wardvissers.nl”
# Select vCenter
$VCServer = $VCServerList | Out-GridView -Title “Select vCenter Server” -OutputMode Single
# write-host $VCServer
$Cred = Get-Credential
# Write-Host $Cred
 
# Set Default Server Mode to Multiple
Set-PowerCLIConfiguration -DefaultVIServerMode Multiple -Confirm:$false | Out-Null
# Connect to vCenter Server(s)
Connect-VIServer -Server “$VCServer” | Out-Null
$DiskInfo= @()
# Select Cluster
$Cluster = Get-Cluster | Out-GridView -Title “Select Target Cluster Node” -OutputMode Single
# write-host $Cluster
# Select VM From Cluster
$Vm = Get-Cluster $Cluster | Get-VM | Out-GridView -Title “Select Virtuele Machine” -OutputMode Single
# write-host $vm

if (($VmView = Get-View -ViewType VirtualMachine -Filter @{“Name” = $Vm.Name})) {
  $WinDisks = Get-WmiObject -Class Win32_DiskDrive -Credential $Cred -ComputerName $VmView.Name
  foreach ($VirtualSCSIController in ($VMView.Config.Hardware.Device | where {$_.DeviceInfo.Label -match “SCSI Controller”})) {
foreach ($VirtualDiskDevice in ($VMView.Config.Hardware.Device | where {$_.ControllerKey -eq $VirtualSCSIController.Key})) {
  $VirtualDisk = “” | Select SCSIController, DiskName, SCSI_Id, DiskFile, DiskSize, WindowsDisk
  $VirtualDisk.SCSIController = $VirtualSCSIController.DeviceInfo.Label
  $VirtualDisk.DiskName = $VirtualDiskDevice.DeviceInfo.Label
  $VirtualDisk.SCSI_Id = “$($VirtualSCSIController.BusNumber) : $($VirtualDiskDevice.UnitNumber)”
$VirtualDisk.DiskFile = $VirtualDiskDevice.Backing.FileName
  $VirtualDisk.DiskSize = $VirtualDiskDevice.CapacityInKB * 1KB / 1GB
  # Match disks based on SCSI ID
  $DiskMatch = $WinDisks | ?{($_.SCSIPort – 2) -eq $VirtualSCSIController.BusNumber -and $_.SCSITargetID -eq $VirtualDiskDevice.UnitNumber}
  if ($DiskMatch){
  $VirtualDisk.WindowsDisk = “Disk $($DiskMatch.Index)”
}
else {Write-Host “No matching Windows disk found for SCSI id $($VirtualDisk.SCSI_Id)”}
  $DiskInfo += $VirtualDisk
  }
  }
  $DiskInfo | Out-GridView
  }
  else {Write-Host “Virtual Machine $Vm Not Found”}

Disconnect-VIServer * -Confirm:$false

Exchange Server 2016 Cumulative Update 7 (KB4018115) and Exchange Server 2013 Cumulative Update 18 (KB4022631)

The latest set of Cumulative Updates for Exchange Server 2016 and Exchange Server 2013 are now available on the download center.  These releases include fixes to customer reported issues, all previously reported security/quality issues and updated functionality.

Minimum supported Forest Functional Level is now 2008R2

In our blog post, Active Directory Forest Functional Levels for Exchange Server 2016, we informed customers that Exchange Server 2016 would enforce a minimum 2008R2 Forest Functional Level requirement for Active Directory.  Cumulative Update 7 for Exchange Server 2016 will now enforce this requirement.  This change will require all domain controllers in a forest where Exchange is installed to be running Windows Server 2008R2 or higher.  Active Directory support for Exchange Server 2013 remains unchanged at this time.

Support for latest .NET Framework

The .NET team is preparing to release a new update to the framework, .NET Framework 4.7.1.  The Exchange Team will include support for .NET Framework 4.7.1 in our December Quarterly updates for Exchange Server 2013 and 2016, at which point it will be optional.  .NET Framework 4.7.1 will be required on Exchange Server 2013 and 2016 installations starting with our June 2018 quarterly releases.  Customers should plan to upgrade to .NET Framework 4.7.1 between the December 2017 and June 2018 quarterly releases.

The Exchange team has decided to skip supporting .NET 4.7.0 with Exchange Server.  We have done this not because of problems with the 4.7.0 version of the Framework, rather as an optimization to encourage adoption of the latest version.

Known unresolved issues in these releases

The following known issues exist in these releases and will be resolved in a future update:

  • Online Archive Folders created in O365 will not appear in the Outlook on the Web UI
  • Information protected e-Mails may show hyperlinks which are not fully translated to a supported, local language

Release Details

KB articles that describe the fixes in each release are available as follows:

Exchange Server 2016 Cumulative Update 7 does not include new updates to Active Directory Schema.  If upgrading from an older Exchange version or installing a new server, Active Directory updates may still be required.  These updates will apply automatically during setup if the logged on user has the required permissions.  If the Exchange Administrator lacks permissions to update Active Directory Schema, a Schema Admin must execute SETUP /PrepareSchema prior to the first Exchange Server installation or upgrade.  The Exchange Administrator should execute SETUP /PrepareAD to ensure RBAC roles are current.

Exchange Server 2013 Cumulative Update 18 does not include updates to Active Directory, but may add additional RBAC definitions to your existing configuration. PrepareAD should be executed prior to upgrading any servers to Cumulative Update 18. PrepareAD will run automatically during the first server upgrade if Exchange Setup detects this is required and the logged on user has sufficient permission.

Additional Information

Microsoft recommends all customers test the deployment of any update in their lab environment to determine the proper installation process for your production environment. For information on extending the schema and configuring Active Directory, please review the appropriate TechNet documentation.

Also, to prevent installation issues you should ensure that the Windows PowerShell Script Execution Policy is set to “Unrestricted” on the server being upgraded or installed. To verify the policy settings, run the Get-ExecutionPolicy cmdlet from PowerShell on the machine being upgraded. If the policies are NOT set to Unrestricted you should use the resolution steps in KB981474 to adjust the settings.

Reminder: Customers in hybrid deployments where Exchange is deployed on-premises and in the cloud, or who are using Exchange Online Archiving (EOA) with their on-premises Exchange deployment are required to deploy the most current (e.g., 2013 CU18, 2016 CU7) or the prior (e.g., 2013 CU17, 2016 CU6) Cumulative Update release.

For the latest information on Exchange Server and product announcements please see What’s New in Exchange Server 2016 and Exchange Server 2016 Release Notes.  You can also find updated information on Exchange Server 2013 in What’s New in Exchange Server 2013, Release Notes and product documentation available on TechNet.

Note: Documentation may not be fully available at the time this post is published.

Critical vulnerability in HPE Integrated Lights-out 4 (iLO 4) 2.53 and previous versions

I wrote a script to do a simple ILO upgrade.

Download the latest firmware HERE

Download HPE Powershell module HERE

Find-HPiLO XXX.XXX.XXX.XXX-(Subnet Mask) | Where {$_.FWRI -lt 2.54 -AND $_.PN -like “*iLO 4*”} | Select -ExpandProperty HOSTNAME | Out-File c:\temp\ilo4.txt
$server = get-content c:\temp\ilo4.txt
$username = “Administrator”
$ilocreds = read-host “Please enter your password”
Update-HPiLOFirmware -Server $server -username $username -password $ilocreds  -Location X:\HP\ILO\ilo4_254.bin

New MVA learning paths for IT pros

Learn about the new paths for IT pros:

  • PowerShell: Beginner. Step up your IT pro game with foundational knowledge of PowerShell. Learn to use the command line to solve an issue, automate your infrastructure, and more.
  • PowerShell: Advanced. Go beyond the basics with scripting, reusable tools, and cmdlets—all taught by the architect and inventor of PowerShell, Jeffrey Snover.
  • Security for IT Pros. Beef up your security know-how with practical tips and tricks from the Microsoft security team.
  • DevOps for IT Pros. Your devs need you! Learn more about application performance and support monitoring with Microsoft Azure.
  • Introduction to Windows Server 2012 R2. Command this leading-edge server with tutorials on installation, roles, Microsoft Active Directory, storage, performance management, and maintenance.
  • Windows Server 2012 R2 Security and Identity. Build upon your security knowledge with Windows Server 2016 fundamentals, like Active Directory, basic PKI, and BYOD concepts.
  • Windows Server 2012 R2 Compute. Discover everything you need to know about virtualization and storage with courses on IP address management, server networking, Microsoft Hyper-V, and more.
Translate »