My HomeLab anno 2024

My home lab is manly used for testing new stuff released by VMware (70%) en Microsoft (20%) other stuff (10%)

For the Base I use my Home PC

Intel i5 12600k
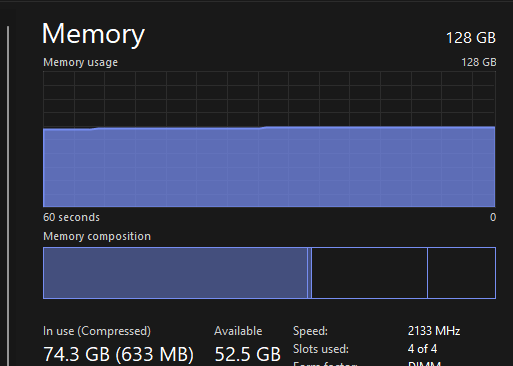
128 GB Memory
2 x 2TB Samsung 980 and 990 Pro SSD.
Windows 11 Pro
VMware Workstation Pro

On my Home PC running
Server 2022 (Eval for DC)
ESXi801 (16 GB) (NSX Demo Cluster)
ESXi802 (16 GB) (NSX Demo Cluster)
ESXi803 (64 GB) (General Cluster) )
ESXi804 (64 GB) (General Cluster)
ESXi805 (24 GB) (Single Node vSAN Cluster)
ESXi806 (16 GB) (4 Node vSAN Cluster)
ESXi807 (16 GB) (4 Node vSAN Cluster)
ESXi808 (16 GB) (4 Node vSAN Cluster)
ESXi809 (16 GB) (4 Node vSAN Cluster)

ESXi701 (24GB) (General Cluster)
ESXi702 (24GB) (General Cluster)

In general cluster there a running the most VM’s. Also here I am testing Packer and Terraform.

Afbeelding met tekst, schermopname, software, Lettertype

Automatisch gegenereerde beschrijving

For a while I used a 2TB Samsung SSD a Storage for ESXi Server through Truenas
But I wanted a larger storage for all my VM’s.

After reading on William Liam blog Synology DS723+ in Homelab and Synology NFS VAAI Plug-in support for vSphere 8.0

So I did a nice upgrade. Afbeelding met tekst, schermopname, software, nummer

Automatisch gegenereerde beschrijving

I used not the original Synology Parts. Following parts works fine.
Kingston 16 GB DDR4-3200 notebook memory
WD Red SN700, 500 GB SSD
WD Red Pro, 8 TB

* For Read-Write caching you need 2 SSD devices.

For mouting the NFS shared I created a little powercli script.

https://github.com/WardVissers/VMware-Powercli-Public/blob/main/Add%20NFS%20DataStore%20Github.ps1

VCF 5.0 running inside Nested ESXi server with only 64GB Memory

So I interested to trying to deploy latest release of VMware Cloud Foundation (VCF) 5.0 on my Windows 11 Home PC witch have 128GB and 16 core intel cpu.

William Lee wrote a nice artikel about VMware Cloud Foundation 5.0 running on Intel NUC

Disclaimer: This is not officially supported by VMware, please use at your own risk.

Requirements:

  • VMware Cloud Builder 5.0 OVA (Build 21822418)
  • VCF 5.0 Licenses Through VMUG ADVANTAGE
  • Home PC (Not Special Hardware)
    – 128GB Memory
    – Intel 12600 CPU
    – 4TB of NVME Storage
  • Windows 11 with VMware Workstation 17

Setup

Virtual Machines

  • DC02 (Domain Controller, DNS Server) (4GB 2vcpu)
  • VCF-M01-ESX01 (ESXi 8.0 Update 1a) (64GBGB 1x140GB 2x600NVME 2x NIC) (Every Thin Provisiond)
  • VCF-M01-CB01 (4GB and 4CPU) Only needed through First Deploment

Network settings on my PC

  • 1 IP In my home network
  • 172.16.12.1 (To Fool Cloudbuilder)
  • 172.16.13.1 (To Fool Cloudbuilder)

Procedure:

Install en Configure ESXi

Step 1 – Boot up the ESXi installer from de iso mount and then perform a standard ESXi installation.

Step 2 – Once ESXi is up and running, you will need to minimally configure networking along with an FQDN (ensure proper DNS resolution), NTP and specify which SSD should be used for the vSAN capacity drive. You can use the DCUI to setup the initial networking but recommend switching to ESXi Shell afterwards and finish the require preparations steps as demonstrated in the following ESXCLI commands:

esxcli system ntp set -e true -s pool.ntp.org
esxcli system hostname set –fqdn vcf-m01-esx01.wardvissers.nl

Note: Use vdq -q command to query for the available disks for use with vSAN and ensure there are no partitions residing on the 600GB disks.
Don’t change time server pool.ntp.org.

To ensure that the self-signed TLS certificate that ESXi generates matches that of the FQDN that you had configured, we will need to regenerate the certificate and restart hostd for the changes to go into effect by running the following commands within ESXi Shell:

/bin/generate-certificates
/etc/init.d/hostd restart

Cloudbuilder Config

Step 3 – Deploy the VMware Cloud builder in a separate environment and wait for it to be accessible over the browser. Once CB is online, download the setup_vmware_cloud_builder_for_one_node_management_domain.sh setup script and transfer that to the CB system using the admin user account (root is disabled by default).

Step 4 – Switch to the root user and set the script to have the executable permission and run the script as shown below

su –
chmod +x setup_vmware_cloud_builder_for_one_node_management_domain.sh
./setup_vmware_cloud_builder_for_one_node_management_domain.sh

The script will take some time, especially as it converts the NSX OVA->OVF->OVA and if everything was configured successfully, you should see the same output as the screenshot above.

A screenshot of a computer

Description automatically generated

Step 4 – Download the example JSON deployment file vcf50-management-domain-example.json and and adjust the values based on your environment. In addition to changing the hostname/IP Addresses you will also need to replace all the FILL_ME_IN_VCF_*_LICENSE_KEY with valid VCF 5.0 license keys.

Step 5 – The VMnic in the Cloud Builder VM will acked als a 10GB NIC so I started the deployment not through powershell but normal way in Cloud Builder GUI.

Your deployment time will vary based on your physical resources but it should eventually complete with everything show success as shown in the screenshot below. (I have one retry for finish)
A screenshot of a computer

Description automatically generated A screenshot of a cloud support

Description automatically generated
Here are some screenshots VCF 5.0 deployment running on my home PC.

A screenshot of a computer

Description automatically generated

A screenshot of a computer

Description automatically generated

Problems

Check this if you have problems logging in NSX:
https://www.wardvissers.nl/2023/07/26/nsx-endless-spinning-blue-cirle-after-login/

Next Steps.

1. Reploy with use of the Holo-Router https://core.vmware.com/resource/holo-toolkit-20-deploy-router#deploy-holo-router

2. Testing if can deploy Single Host VCF Workload Domain, on same way by following this blog post HERE! 😁
A screenshot of a computer

Description automatically generated

If I can start another 64GB ESXi Server.

Enable Virtualization-based Security on a Virtual Machine on Nested ESXi Server in VMware Workstation

First Step Shutdown ESXi Server enable Encryption
Graphical user interface, application

Description automatically generated

Second Add vTPM

Graphical user interface, application, Word

Description automatically generated

Boot ESXi Server(s)

Configure Key Providers (Add Native Key Provider)

Graphical user interface, text, application, website

Description automatically generated

A screenshot of a computer

Description automatically generated

Now you can add vTPM to you VM
Don’t forget to enable VBS

Graphical user interface, application

Description automatically generated

Create GPO SRV 2022 – Virtualization Based Security and I did Apply only to my Server 2022 Lab Environment
Graphical user interface, application

Description automatically generated

System Information on my Server 2022 Lab Server
A screenshot of a computer

Description automatically generated with medium confidence

How to setup a remote PowerShell-session with Exchange 2013

Now I want to manage my Exchange 2013 environment from the Windows 8 workstation, no Exchange tools are installed on the Windows 8 laptop. In a few simple steps you can open a remote PowerShell session to one of the Exchange Servers.

Logon to the Windows 8 machine and start the ‘Windows PowerShell ISE


$RemoteEx2013Session = New-PSSession -ConfigurationName Microsoft.Exchange `
                                     -ConnectionUri http://servername/PowerShell/ `
                                     -Authentication Kerberos -Credential (Get-credential)
Import-PSSession $RemoteEx2013Session

Save this to Remote Exchange 2013 Powershell.ps1

Don’t forget setting your Powershell to unrestricted with: set-executionpolicy unrestricted

Part 1: Running XPEnology under Hyper-V

Some times you find a cool feature on the internet.

XPEnology is an operating system based on Synology DiskStation Manager (DSM). This is possible because Synology DSM has developed under the GPL license . As a result, it is free to use and adapt by third parties. The advantage of XPEnology is that it is compatible with many different hardware and so you almost any old PC / server can use as a NAS. Also you can also XPEnology as a virtual machine (VM) running on ESXi for example, Hyper-V, VirtualBox.

With this flexibility, functionality and ease XPEnology offers a good alternative to a Synology NAS or other NAS solutions.

On XPenology.nl you will find great articles how to run the Software on Hyper-V, ESXi, Workstation and on dedictad hardware.

So i followed this guide: http://www.xpenology.nl/hyper-v-installatie/

image

image

image

Awesome!!! Open-mouthed smile Open-mouthed smileOpen-mouthed smile

Things to do:
1. Hyper-V Harddisk Pass Through
2. Install & Config SABnzbd
3. Install  &Config Sickbeard
4. Install & Config Couchpotato
5. Config my Diskstation with DNLA to my TV

Keep you posted!!!

VMware Workstation 10

VMware Workstation takes virtualization to the next level:

  • Support for the latest Guest OS’es like Microsoft Windows 8.1 and various Linux distributions.
  • The new hardware version 10 introduces even bigger and better Virtual Machines
    Up to 16 vCPUs
    64GB of vRAM
    8TB disks.
    vSATA support has been added
    Up to 20 networks can be defined.
    Various USB improvements (usb3 stream support, among other things)
    SSD pass through makes for better support of the underlying hardware platform.
  • New Virtual Appliances created with the Workstation team to quickly run various cloud stacks like Pivotal, Puppet Labs and Vagrant.

The team has included various smaller improvements in the product as well:

  • Better multi-monitor support for up to 4 screens
  • Unity mode has been enhanced to seamlessly work with Windows 8.1 UI changes
  • An updated version of VMware Converter has been built in and adds support for P2V’ing a Windows 8.1 machine
  • New option to display the VM console using VMware-KVM, a ‘screen-only’ window without any bells or whistles.

Immidio releases new version of Flex+ with Support of Windows 8 & Server 2012 & APP-V 5.0

Today, Immidio releases an updated version of its flagship product Flex+. With the Immidio Flex+ workspace virtualization solution, end users get a personalized and dynamic Windows desktop that adapts to their specific situation based on aspects like role, device and location.

Modern workforces expect flexibility from their employers; users need to have the capability to work anywhere with multiple devices and a high degree of self-service. With Flex+ workspace virtualization, Immidio enables such a flexible workstyle in a simple, scalable, extensible and affordable manner, without introducing additional complexity. Immidio Flex+ uses the existing Windows infrastructure, ensuring a low total cost of ownership.

Next to many small improvements, the latest version of Immidio Flex+ contains new features that were mostly developed based on feedback from Immidio’s partners and customers. The focus of this release is to support the latest Windows versions and application virtualization technologies, providing users with an even more dynamic desktop experience and improving the administration of Flex+ in enterprise environments.

Flex+ multi-tenancy support for IT departments
Immidio Flex+ has always supported multi-tenant environments, and this release introduces much improved management of scenarios with multiple environments, such as different customers, DTAP, or separately managed organizational divisions, for instance.

Such setups can now be managed from within a single instance of the Flex+ management console, making it possible for the IT department to switch between these environments and also export configuration items from one environment to another.

An even more dynamic desktop experience
In the initial release of Flex+, Immidio introduced many capabilities for managing the user environment. Flex+ support for shortcuts, file type associations and printers is now even more powerful thanks to the new UEM Refresh feature, which during a Windows session reapplies these user environment settings, dynamically re-evaluating conditions.

Another new feature is Triggered Tasks which executes a custom or built-in task (like UEM Refresh) when a certain trigger occurs. The triggers that Flex+ supports are the lock/unlock of a workstation and disconnect/reconnect of a remote session in VDI and RDS environments.

To improve the dynamic adaption of the Windows user environment, based on role, device and location, this release extends the conditions available in Flex+. The new battery condition makes it easier to detect laptops and tablet devices. The new “Computer or User in Active Directory” condition helps determine the role of the user within the organization and the place of the currently used device within the IT infrastructure.

Support of latest technologies
Immidio Flex+ now supports personalization for Microsoft App-V 5.0, in addition to the existing App-V 4.x integration. Platform support has been extended with Windows 8 and Server 2012.

Other improvements
Many other improvements have been made to the Flex+ management console and client component. These are all documented in the Administrator’s Guide of this Flex+ release.

Issue with Windows Management Framework 3.0 on Exchange 2007 and Exchange 2010

Recently, Windows Update began offering the Windows Management Framework 3.0 as an Optional update. This includes all forms of update distribution, such as Microsoft Update, WSUS, System Center Configuration Manager and other mechanisms. The key bit here is that the Windows Management Framework 3.0 includes PowerShell 3.0.

Windows Management Framework 3.0 is being distributed as KB2506146 and KB2506143 (which one is offered depends on which server version you are running – 2008 Sp2 or 2008 R2 Sp1).

What does that mean to you?

Windows Management Framework 3.0 (specifically PowerShell 3.0) is not yet supported on any version of Exchange except Exchange Server 2013 (which requires it). If you install Windows Management Framework 3.0 on a server running Exchange 2007 or Exchange 2010, you will encounter problems, such as Rollups that will not install, or the Exchange Management Shell may not run properly.

We have seen rollups not installing with the following symptoms:

  • If rollup is installed through Microsoft Update, the installation might error with error code of 80070643
  • If rollup is installed from a download, the error displayed is “Setup ended prematurely because of an error.”
  • In both cases, event log might show the error with an error code of “1603”

Exchange Team adviced that Windows Management Framework 3.0 should not be deployed on servers running Exchange 2007 or Exchange 2010, or on workstations with the Exchange Management Tools for either version installed. If you have already deployed this update, it should be removed. Once the update is removed, functionality should be restored.

VMware Workstation 9.0.1

In this “maintenance” release we can see that few OS support has been added and some bug fixes has been issued as well. This release comes only after two and half months, where VMware Workstation 9 has been released.

What’s new in the Version 9.0.1 – Build Number:894247

  • Support for Ubuntu 12.10 as a host and guest.
  • Solaris 11 has been added to guest OS list

Fixes:

  • When powering on a virtual machine with Binary Translation on a SMEP-capable CPU, Workstation no longer causes the host to reset. If you run Windows 8 hosts on Ivy Bridge processors, VMware strongly recommends that you update your installation of Workstation.
  • Several security vulnerabilities have been addressed, including updating third party libraries.
  • The Workstation plug-in for Visual Studio has been updated to work with Visual Studio 2012.
  • For host systems with more than 4GB of memory, Workstation will use more of the available memory to run virtual machines.
  • The ability to mount a .vmdk file as a drive by right-clicking the file in File Explorer has been restored.
  • Streaming a virtual machines has been fixed.
  • Occasionally, certain elements in the Windows 8 user interface were incorrectly displayed. This has been fixed.
  • After disconnecting certain USB devices from a virtual machine, Workstation would prevent devices from being reconnected without restarting the virtual machine. A more comprehensive error handling code has been added to prevent this problem from occurring.
  • To improve application startup performance, the data being collected as part of the optional User Experience Improvement Program will no longer be aggregated on every launch of Workstation.
  • Remotely retrieving the IP address of an Ubuntu virtual machine with an IPv6 address assigned failed unless an IPv4 address was also assigned to the virtual machine. This no longer occures.
  • With IPv6 disabled on the host, the Linux version of Workstation is now able to share virtual machines.
  • When you import an OVA file of a virtual machine running the Datacenter version of Windows Server, the network adapter failed to be configured correctly. This is now fixed.
  • Closing Workstation in the middle of a cut and paste operation no longer causes the Workstation user interface to crash.
  • After unsharing a virtual machine configured to use client-side devices, you can now reconfigure the device settings to use local devices.
  • Easy Install on the Linux version of Workstation now recognize all compatible operating systems.
  • The VMware monitor has been updated to work with Linux kernel 3.5.
  • On the Linux version of Workstation, entering a permanent license key after using an evaluation key now removes the days remaining evaluation indicator.
  • The network adapter configuration screen now correctly preserves the Custom network settings.
  • You can now remove a Network if network settings changes are pending.
  • The Use physical drive radio button for a floppy device was disabled when connecting to a shared virtual machine or remote virtual machine a on host without a physical floppy device. This is now fixed.
  • Animated cursors are now displayed correctly in a virtual machine.

Source: VMware Workstation 9.0.1 Relese Notes Release notes

Windows Assessment and Deployment Kit (ADK) and vSphere 4 does not work together

When you using vSphere 4 and and using MDT 2012 update1 with Windows Assessment and Deployment Kit you run in de following error. Same thing wil also with Workstation 8.clip_image001

Solution 1: Do not install Windows Assessment and Deployment Kit on your MDT Server. You can still using MDT 2012 Update 1 with waik 3.5 if not deploying Windows 8 or Windows 2012 right now.

Solution 2: Upgrading you vSphere server to the latest version (5.1) or Upgrade Workstation to latest version (Version 9).

Translate »